Essential Tools and Materials Needed for Effective Asphalt Driveway Repair
Maintaining a smooth and durable driveway is essential for enhancing your property’s curb appeal and ensuring safe, reliable access to your home or business. Over time, driveways can deteriorate due to weather conditions, heavy traffic, or simple wear and tear. This is especially true for asphalt driveways, which are prone to developing cracks, potholes, and fading if not properly maintained. Asphalt driveway repair is a crucial process that requires specific tools and materials to restore the surface’s appearance and function.
In this comprehensive guide, we will explore the essential tools and materials needed for effective asphalt driveway repair. Whether you’re considering a DIY project or hiring a professional paving company like Commonwealth Paving (located at 136 Outerloop, Louisville, Kentucky 40214), it’s important to understand what goes into repairing an asphalt driveway to ensure long-lasting results.
Understanding Asphalt Driveway Repair
Before diving into the tools and materials required, it’s important to understand what asphalt driveway repair entails. The process typically involves filling cracks, patching potholes, resealing the surface, or even resurfacing the entire driveway if the damage is extensive. The primary goal of repair is to restore the asphalt’s structural integrity, protect it from further damage, and improve its appearance.
Common signs that your asphalt driveway may need repair include:
- Cracks of varying sizes
- Potholes or depressions
- Faded or oxidized surface
- Erosion along the edges
- Uneven or sunken areas
Addressing these issues early can prevent further deterioration and prolong the life of your driveway. For most DIY repairs, the right combination of tools and materials will help you achieve professional-level results.
Essential Tools for Asphalt Driveway Repair
1. Asphalt Crack Filler Applicator
Cracks are one of the most common problems with asphalt driveways, and filling them is essential to preventing water from seeping in and causing more extensive damage. A crack filler applicator is a tool designed to help you apply crack filler evenly and efficiently.
- Pourable Crack Filler: This applicator typically comes with a spout, allowing you to pour the crack filler into narrow or deep cracks easily.
- Squeegee Crack Filler: For wider cracks, a squeegee applicator ensures the filler is spread evenly across the surface.
2. Pavement Cleaning Tools
Before beginning any asphalt driveway repair, cleaning the surface is crucial. Debris, dirt, and vegetation can prevent repair materials from adhering properly.
- Wire Brush: A wire brush is a must-have tool for scrubbing dirt and debris from cracks and damaged areas.
- Leaf Blower or Broom: A leaf blower or heavy-duty broom can clear loose debris from the surface.
- Pressure Washer: For a deeper clean, a pressure washer can remove stubborn dirt, oil stains, and grime, preparing the asphalt for repair.
3. Cold Patch Pothole Repair Tool
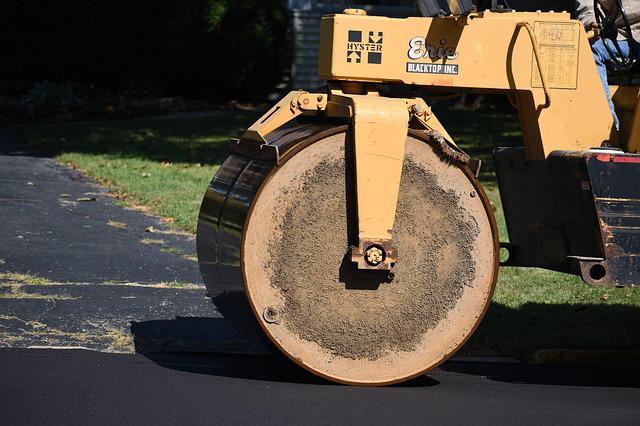
Potholes are another common issue in asphalt driveways. A cold patch pothole repair tool is used to compact and smooth out the patch material after it has been applied.
- Tamper: A hand tamper is ideal for compacting the cold patch material. It ensures that the patch is packed tightly, creating a smooth and even surface.
- Plate Compactor: For larger potholes or commercial-grade repairs, a plate compactor provides more powerful and efficient compaction, ensuring the patch material bonds well with the existing asphalt.
4. Sealcoating Tools
After performing crack filling or patching, sealing the entire driveway is recommended to protect it from further damage caused by UV rays, water, and chemicals. The right tools make sealcoating easier and more effective.
- Sealcoating Brush or Broom: A large brush or broom with stiff bristles helps spread the sealcoat evenly across the driveway.
- Sealcoating Squeegee: For a smooth, uniform finish, a sealcoating squeegee is ideal for applying sealant in a controlled manner, ensuring the asphalt surface is well-coated.
5. Rakes and Shovels
When applying cold patch or asphalt mixes, rakes and shovels are essential for spreading the material and creating a level surface. They are also useful for removing debris during surface preparation.
- Flat Shovel: A flat shovel is particularly useful for spreading asphalt evenly during repair.
- Asphalt Rake: This tool has specially designed teeth to help spread asphalt or patch material in thin layers, which is crucial for achieving a smooth surface.
6. Measuring Tape or Chalk Line
To ensure proper coverage when filling cracks or applying sealcoat, measuring tape or chalk lines can help you plan your work and make sure you’re repairing the entire area efficiently.
7. Safety Gear
Safety should always be a priority during asphalt driveway repair. Proper protective gear is necessary to protect against asphalt dust, fumes, and heat.
- Gloves: Heavy-duty gloves protect your hands when handling hot materials and working with sharp tools.
- Safety Glasses: To protect your eyes from debris and dust, always wear safety glasses while working.
- Respirator Mask: Asphalt products can release fumes, so a respirator mask may be necessary if you’re working with large amounts of material or in enclosed spaces.
Essential Materials for Asphalt Driveway Repair
1. Asphalt Crack Filler
Crack filler is the most common material used in asphalt driveway repair. It comes in various formulations, including liquid, rubberized, or cold-pour products. Crack fillers are designed to expand and contract with the asphalt, sealing cracks and preventing water penetration.
- Cold-Pour Crack Filler: Ideal for small cracks and DIY repairs, cold-pour crack filler is easy to apply and available in tubes or jugs.
- Rubberized Crack Filler: This type of filler is flexible and can handle temperature fluctuations, making it more durable for larger cracks.
2. Cold Patch Asphalt
Cold patch asphalt is used to fill potholes and large depressions in the driveway. This material is ready to use and does not require heating, making it a convenient choice for DIY enthusiasts. Cold patch can be applied directly into the pothole and then compacted to create a smooth surface.
- Cold Mix Asphalt: This is a pre-mixed asphalt product designed for easy application in low-temperature environments.
3. Asphalt Sealer
Asphalt sealer is a protective coating that is applied after repairing cracks or potholes to prevent future damage. It forms a protective barrier against UV rays, water, and chemicals, extending the life of your driveway.
- Coal Tar Sealer: This is one of the most popular sealers, known for its durability and resistance to oil and gasoline spills.
- Acrylic Asphalt Sealer: For a more eco-friendly option, acrylic asphalt sealer offers long-lasting protection without harmful chemicals.
4. Pothole Patching Material
In addition to cold patch asphalt, there are various materials available for patching potholes. Some are designed for specific climates or surface conditions.
- Polymer-Modified Patching Mix: This material is reinforced with polymers for extra durability and flexibility, making it ideal for areas with heavy traffic.
- Hot Asphalt Mix: While more common for professional use, hot asphalt mix provides a more durable solution for larger or more severe potholes.
5. Primer or Tack Coat
In some cases, a primer or tack coat is needed to improve adhesion between the old asphalt and the new repair material. This is especially important when patching large areas or using cold patch products. Tack coat ensures that the new material bonds securely with the existing asphalt, preventing it from separating or shifting over time.
6. Sand and Gravel
In some repairs, especially when dealing with larger potholes or low spots, sand and gravel may be used as a base material. This helps create a stable foundation for the cold patch or asphalt mix, ensuring the repair lasts longer.
Step-by-Step Process for Asphalt Driveway Repair
Now that we’ve covered the essential tools and materials needed for asphalt driveway repair, let’s go over the basic steps involved in the process.
1. Inspect the Driveway
Start by inspecting your driveway for any cracks, potholes, or surface damage. Make note of the areas that need repair and the materials required to fix them.
2. Clean the Surface
Use a wire brush, broom, and pressure washer to clean the surface thoroughly. Remove any debris, dirt, or vegetation from cracks and damaged areas to ensure the repair materials adhere properly.
3. Fill Cracks
Using a crack filler applicator, fill all visible cracks with an appropriate crack filler. Be sure to follow the manufacturer’s instructions for application and allow the filler to cure as directed.
4. Repair Potholes
For potholes, remove any loose debris and fill the hole with cold patch asphalt. Use a shovel to spread the material evenly, then compact it with a tamper or plate compactor. Add more material as needed and compact again to ensure a smooth finish.
5. Apply Sealcoat
Once the cracks and potholes have been repaired, apply a coat of asphalt sealer to protect the surface. Use a sealcoating brush or squeegee to spread the sealer evenly across the driveway, paying special attention to the edges and corners.
6. Allow Time to Cure
After completing the asphalt driveway repair, allow the surface to cure for the recommended time before driving or walking on it. This will ensure the repairs set properly and last for years to come.
Get Professional Assistance from Commonwealth Paving
While DIY asphalt driveway repair is possible with the right tools and materials, hiring a professional paving company can ensure that the job is done efficiently and correctly. Commonwealth Paving, located at 136 Outerloop, Louisville, Kentucky 40214, offers expert driveway repair services that can save you time and money. We use high-quality materials and advanced techniques to ensure your driveway is restored to its original condition.
If you need assistance with your asphalt driveway repair or have any questions about the process, contact Commonwealth Paving at +1 502 459 7283 today. Let us help you enhance your property with professional paving solutions.
The Top Mistakes to Avoid During Asphalt Driveway Repair
When it comes to asphalt driveway repair, the process might seem straightforward, but several common mistakes can undermine the effectiveness of the repair and lead to further issues down the road. Whether you’re tackling a DIY project or overseeing a professional repair, avoiding these pitfalls is crucial to achieving a long-lasting, smooth, and durable asphalt surface.
In this comprehensive guide, we’ll discuss the top mistakes to avoid during asphalt driveway repair and provide practical tips to ensure that your repair job stands the test of time. If you need professional assistance or advice, Commonwealth Paving, located at 136 Outerloop, Louisville, Kentucky 40214, is here to help. You can reach us at +1 502 459 7283 for expert paving services.
1. Skipping the Surface Preparation
Importance of Proper Preparation
One of the most critical steps in asphalt driveway repair is proper surface preparation. Skipping this step can lead to poor adhesion of repair materials, which can result in premature failure of the repair.
Common Errors
- Failing to Clean the Surface: Not cleaning the surface thoroughly can lead to debris, dirt, and oil preventing the repair materials from adhering properly.
- Ignoring Vegetation: Weeds or grass growing in cracks or damaged areas can interfere with the repair process and cause the materials to fail.
How to Avoid These Mistakes
- Clean the Driveway: Use a wire brush, broom, and pressure washer to remove all debris, dirt, and vegetation. Ensure that the surface is completely dry before applying any repair materials.
- Inspect for Vegetation: Remove any weeds or grass from cracks or damaged areas and apply an appropriate herbicide if needed.
2. Using Inappropriate Repair Materials
Choosing the Right Materials
Using the wrong repair materials can lead to ineffective repairs and a shorter lifespan for your driveway. It’s essential to choose materials that are suitable for the specific type of damage and the climate in your area.
Common Errors
- Using Cold Patch for Large Areas: Cold patch asphalt is great for small potholes, but it may not be the best choice for larger areas or extensive damage.
- Incorrect Crack Filler: Using a crack filler that isn’t designed for the type of crack or for your climate can result in poor adhesion and durability.
How to Avoid These Mistakes
- Select the Right Material: For large potholes or extensive damage, consider using hot asphalt mix or consulting a professional for the best material choice.
- Match Filler to the Crack Type: Choose a crack filler that is specifically designed for the type of crack you are repairing and suitable for your local climate.
3. Overlooking Proper Application Techniques
Importance of Correct Application
Proper application techniques are vital for ensuring that repair materials adhere well and create a smooth, long-lasting surface. Poor application can result in uneven surfaces, incomplete repairs, and a shorter lifespan for the repair.
Common Errors
- Applying Repair Materials Incorrectly: Overfilling or underfilling cracks and potholes can lead to uneven surfaces and ineffective repairs.
- Inadequate Compaction: Failing to compact patch material properly can result in it settling unevenly or breaking down prematurely.
How to Avoid These Mistakes
- Follow Manufacturer Instructions: Adhere to the application guidelines provided by the manufacturer of the repair materials.
- Use Proper Tools: Use the appropriate tools for spreading and compacting repair materials to ensure an even application.
- Ensure Proper Compaction: For potholes and large cracks, use a tamper or plate compactor to ensure the patch material is packed tightly and evenly.
4. Ignoring Weather Conditions
Impact of Weather on Repairs
Weather conditions play a significant role in the success of asphalt driveway repair. Repairing an asphalt driveway under unsuitable weather conditions can lead to poor results and premature failure.
Common Errors
- Repairing in Extreme Temperatures: Applying repair materials in extreme heat or cold can affect their effectiveness and adhesion.
- Repairing During Rain: Rain can wash away or dilute repair materials, leading to ineffective repairs.
How to Avoid These Mistakes
- Check Weather Forecasts: Ensure that weather conditions are suitable for repair before starting the project. Ideally, repairs should be done in mild, dry weather.
- Plan Repairs Wisely: Avoid scheduling repairs during periods of extreme heat, cold, or rain. Allow for proper curing time before subjecting the repaired area to heavy traffic or adverse weather.
5. Neglecting to Seal the Driveway
Benefits of Sealcoating
Sealcoating is a crucial step in asphalt driveway repair that protects the surface from UV rays, water damage, and chemical spills. Neglecting to seal the driveway after repairs can leave it vulnerable to further damage.
Common Errors
- Skipping Sealcoating: Not applying a sealant after repairs can result in faster deterioration of the asphalt surface.
- Using an Inappropriate Sealant: Choosing the wrong type of sealant can lead to ineffective protection and reduced lifespan.
How to Avoid These Mistakes
- Apply Sealcoat After Repairs: Ensure that the surface is clean and dry before applying a high-quality sealcoat to protect the repaired area.
- Choose the Right Sealant: Select a sealant that is compatible with your asphalt and suitable for your local climate conditions.
6. Failing to Address Underlying Issues
Importance of Identifying Underlying Problems
Addressing surface-level damage without fixing underlying issues can result in repeated problems and ineffective repairs. It’s essential to identify and address the root causes of damage to ensure long-lasting results.
Common Errors
- Ignoring Drainage Issues: Poor drainage can lead to water pooling and accelerating damage to the asphalt surface.
- Neglecting Subsurface Problems: Cracks and potholes may be symptoms of underlying issues such as soil erosion or base failure.
How to Avoid These Mistakes
- Inspect for Underlying Problems: Assess the driveway for any drainage issues or subsurface problems that may be contributing to the damage.
- Address Root Causes: Repair or improve drainage systems and address any subsurface issues before proceeding with surface repairs.
7. Inadequate Maintenance After Repair
Importance of Regular Maintenance
Even after a successful asphalt driveway repair, regular maintenance is essential to prolonging the life of your driveway and preventing future damage. Neglecting maintenance can lead to recurring issues and additional repair costs.
Common Errors
- Skipping Routine Inspections: Failing to regularly inspect the driveway for new cracks, potholes, or signs of wear can result in small issues becoming major problems.
- Neglecting Regular Sealing: Not applying sealcoating on a regular basis can leave the asphalt surface unprotected and susceptible to damage.
How to Avoid These Mistakes
- Conduct Regular Inspections: Regularly inspect your driveway for any signs of damage or wear and address issues promptly.
- Schedule Routine Sealcoating: Plan to apply sealcoating every 1-2 years to protect the asphalt surface and maintain its appearance.
8. Not Following Safety Precautions
Importance of Safety
Repairing an asphalt driveway involves handling potentially hazardous materials and equipment. Ignoring safety precautions can result in accidents, injuries, or damage to your property.
Common Errors
- Not Wearing Protective Gear: Failing to wear gloves, safety glasses, or a respirator mask can expose you to harmful materials and fumes.
- Improper Use of Equipment: Using equipment incorrectly can lead to accidents or damage to the asphalt surface.
How to Avoid These Mistakes
- Wear Appropriate Safety Gear: Always use gloves, safety glasses, and a respirator mask when handling asphalt materials or working with equipment.
- Follow Equipment Instructions: Read and follow the manufacturer’s instructions for any equipment used in the repair process to ensure safe and effective use.
Get Professional Help with Commonwealth Paving
Avoiding these common mistakes can make a significant difference in the success of your asphalt driveway repair project. Proper surface preparation, selecting the right materials, using correct application techniques, and addressing underlying issues are all critical steps in achieving a high-quality repair.
If you’re unsure about handling your asphalt driveway repair or want to ensure the best possible results, Commonwealth Paving is here to help. Located at 136 Outerloop, Louisville, Kentucky 40214, we offer professional paving services and expert advice to ensure your driveway is repaired to the highest standards. Contact us at +1 502 459 7283 for a consultation and let us help you achieve a durable and attractive asphalt surface.
Address
Commonwealth Paving, 136 Outerloop, Louisville, Kentucky 40214
Phone: 502-459-7283, Fax: 502-456-2678
Opening Hours
| Monday | 9:00 AM – 5:00 PM |
| Tuesday | 9:00 AM – 5:00 PM |
| Wednesday | 9:00 AM – 5:00 PM |
| Thursday | 9:00 AM – 5:00 PM |
| Friday | 9:00 AM – 5:00 PM |
| Saturday | Closed |
| Sunday | Closed |


