How to install rubber speed bumps
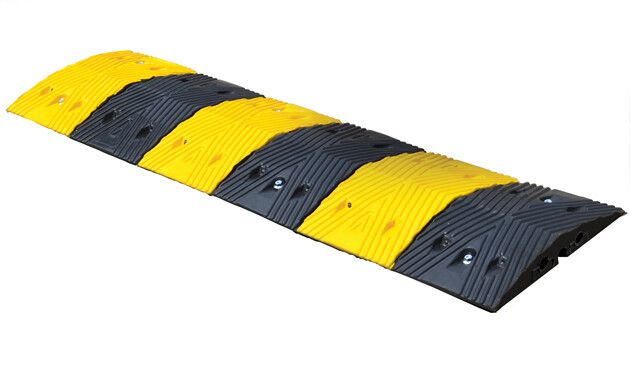
To curb tremendous accidents from happening, road safety and public places, including school areas, parking lots, road pavements, and many others, need speed regulation. Rubber speed bumps are mainly made to improve pedestrians’ safety, lower fatalities threats from road accidents, and reinforcing stop signs in parking lots. Vehicle speeding in driveways and parking lots can be efficiently controlled by installing rubber speed bumps; they come in various distinct inches, shapes, and lengths. Besides, they are positioned on significant road sections to make it easy for drivers to slow down or calm down when driving. Rubber speed bumps come in different types; however, unlike traditional concrete bumps or asphalt bumps, rubber speed bumps have more advantages.

Attributes and merits of rubber speed bumpers make it easy for individuals to refer them over the other alternative speed bumps. In fact, unlike other speed bumps such as metal or asphalt, rubber speed bumps are pocket-friendly. They have incredible qualities of long-lasting and durability because they do not crack or cheap easily. Also, rubber speed bumps are effectively water-resistant; even during winter, snow and ice melting cannot damage them.
Rubber speed bumps will not only save you money, but they are also environmentally friendly because the materials used to make them are a hundred percent recycled. They have better visibility due to their reflective bright yellow stripes that assist drivers in navigating with caution. Furthermore, the installation process is simple and can be performed by a single individual. It is convenient due to its flexibility; speed bumps can be removed during the winter season to enable pavement maintenance and snow plowing. Additionally, speed bumps are suitable for all types of roads because of the asphalt coating layer and polishing used on the rubber, rescuing you from spending additional money on extra coatings.
There are different kinds of bumps, they include
- temporary
- Portable
- Reflective
- Black
- Heavy-duty
The following are the three major steps adhered to when installing rubber speed breakers on asphalt pavements.
- Step 1. Using steel spikes on the asphalt pavement. It is vital to position your rubber speed bump on the intended position on your driveway or parking lot. You can use a marker, for instance, chalk, to make marks on the pavement inside the bolt holes, then remove the speed bump.
- Step 2. This second step includes drilling on every marking made by the chalk to develop bolt holes; after that, clean and dry the place.
- Step 3. This is the third and final step. Insert the bolts using a washer through the bolt holes, begging from center, tighten every bolt till its three-quarters inches inside the bolt hole.
After the installation is over, you should ensure that you drive at a speed of twenty kilometers per hour because the primary purpose of a speed bump is to slow down the traffic. Therefore, so long as you drive responsibly slowly, there will be harm whatsoever that might face your car, and you will be saving pedestrians from injuries. Also, if you desire to drive over a rubber speed bump smoothly, you should avoid braking and accelerate averagely.
Please do not turn away the perfect option to assist you to regulate speed near the driveway, parking lot, school, or any other public place. You can simply implement speed bumps that can be easily executed on any asphalt pavement and prevent tiny mistakes that can easily lead to fatal accidents.
Address
Commonwealth Paving, 136 Outerloop, Louisville, Kentucky 40214
Phone: 502-459-7283, Fax: 502-456-2678
Opening Hours
| Monday | 8:00 a.m. – 5:00 p.m. |
| Tuesday | 8:00 a.m. – 5:00 p.m. |
| Wednesday | 8:00 a.m. – 5:00 p.m. |
| Thursday | 8:00 a.m. – 5:00 p.m. |
| Friday | 8:00 a.m. – 5:00 p.m. |
| Saturday | Closed |
| Sunday | Closed |


